


Using w3up-cli
We recently introduced w3up, our new upload service built on a brand new foundation.
Today, we'll take a look at w3cli, the command-line interface for the w3up service.
Update: This post was updated in January 2023 to reflect changes made during the beta development cycle. The w3up-cli tool originally described in this post has been deprecated and replaced by w3cli. See our announcement post for more information about the changes in beta v2.
Getting Started
w3cli is avaliable through NPM.
You can install it from a command shell using npm install:
npm install -g @web3-storage/w3cli
This should make a new w3 command available. Try running w3 --help. You should see some help text similar to this:
  Usage
    $ w3 <command> [options]

  Available Commands
    up                   Store a file(s) to the service and register an upload.
    open                 Open CID on https://w3s.link
    ls                   List uploads in the current space
    rm                   Remove an upload from the uploads listing.
    whoami               Print information about the current agent.
    space                Create and mangage w3 spaces
    space create         Create a new w3 space
    space register       Claim the space by associating it with your email address
    space add            Add a space to the agent.
    space ls             List spaces known to the agent
    space use            Set the current space in use by the agent
    delegation create    Create a delegation to the passed audience for the given abilities with the _current_ space as the resource.
    delegation ls        List delegations created by this agent for others.
    proof add            Add a proof delegated to this agent.
    proof ls             List proofs of capabilities delegated to this agent.
    can store add        Store a CAR file with the service.
    can upload add       Register an upload - a DAG with the given root data CID that is stored in the given CAR shard(s), identified by CAR CIDs.

  For more info, run any command with the `--help` flag
    $ w3 up --help
    $ w3 open --help

  Options
    -v, --version    Displays current version
    -h, --help       Displays this message

  Examples
    $ w3 up path/to/files
In this post we'll walk through everything you need to get started uploading files using the w3 tool.
Creating and registering a space
Files that you upload to w3up are organized into "spaces," which act a bit like cloud storage buckets.
You can have multiple spaces, but you'll need at least one in order to upload.
Create your first space with the w3 space create command:
w3 space create Documents
You should see something like this, although your identifier will be different:
did:key:z6MkvjhcXtyKA7qsU8wwEwf9qZSUZ9FkksG4xLEwofKGUe9S
We've given our new space the name "Documents." You can name your spaces whatever you want, or skip the name entirely and just refer to them by their DID.
Before we can upload files, we need to register our space with the w3up service using w3 space register:
w3 space register your-address@email-provider.net
Replace your-address@email-provider.net with your actual address, and check your inbox for a confirmation email. Once you click the link in the confirmation email, you shoud see a confirmation message. Now you're ready to upload!
Uploading files
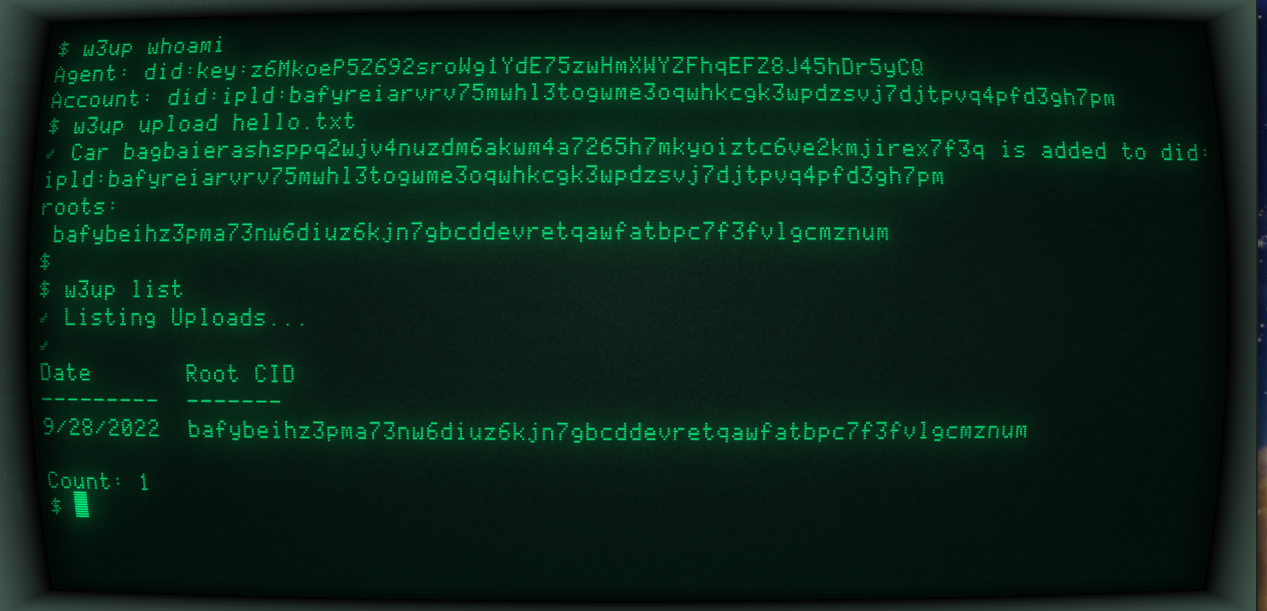
The w3 upcommand takes the path to a file or directory and uploads it to the w3up service.
Below we'll make a text file with the contents "Hello, Web3" and upload it using w3up upload.
echo "Hello, Web3" > hello.txt

w3 up hello.txt
You'll see something like this:
  1 file (12B)
  bagbaieraspawtgooy5lptr7loyd3fxjsrgkamre3y6au3ga4df5bkhrxdkmq
⁂ Stored 1 file
⁂ https://w3s.link/ipfs/bafybeidwm2gfdrx2yjnzdqnw7n3a2er2vo5uwv6w5otjfbyboeoq3jfiby
The output above shows two CIDs (Content Identifiers), and if you used the same hello.txt file you should see the exact same CIDs. Of course, if you're uploading a different file, the CIDs will be different, but you should still see two of them in the output.
The first CID (starting with bag) identifies the Content Archive (CAR) that w3up prepares when uploading data. CARs are collections of content addressed data in an "IPFS native" format, and w3up uses them extensively under the hood. Generating CARs on the client side helps us ensure end-to-end data integrity, and it helps streamline the upload process and ingestion into Elastic IPFS.
The second CID is embedded into the w3s.link gateway URL that's printed to the console. This CID identifies the "root" of the graph of content addressed data that is contained in the CAR. All data on IPFS is encoded into a set of "blocks" of binary data, with links between blocks forming a graph.
Following the URL will take you to an IPFS gateway, where you'll see an IPFS directory listing containing our `hello.txt` file:
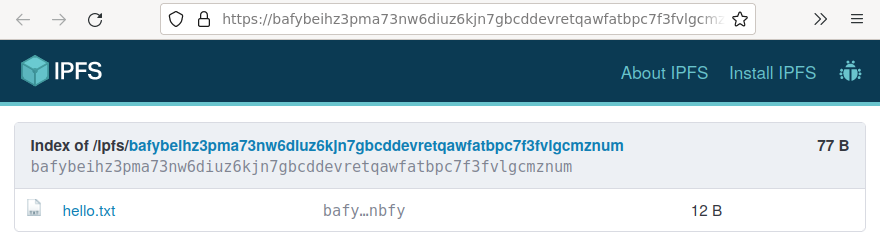
Gateway URLs let you "bridge the gap" between IPFS and the web2 protocols supported by all browsers today. You can learn more about gateways in the IPFS documentation, but the TL;DR is to make a URL of the form https://$CID.ipfs.$GATEWAY_HOST or https://$GATEWAY_HOST/ipfs/$CID, where $GATEWAY_HOST is the domain of the gateway, and $CID is the root CID of your content.
Verifying the upload
Once your upload completes, you can use the w3up list command to get a list of all the uploads you've made so far.
w3 list
You'll see something like this:
bafybeidwm2gfdrx2yjnzdqnw7n3a2er2vo5uwv6w5otjfbyboeoq3jfiby
Here we can see the root CIDs of the content we've uploaded so far. Note that we're likely to tweak things a bit during the beta period, so your output may look a little different depending on when you run the command.
What's next?
The w3 tool has more commands for managing your spaces, delegating permissions, and more. Check out the README for more details.
We're still building w3up and are adding and refining features every day. We need your help to build the best possible platform, so please reach out and let us know how you're using it and how we can improve things for your needs.
We'll also be posting updates to this blog as things roll out, so stay tuned!